Technical Tip
If Scanner Mode and Change Pricing are both set to No, the user need only enter the part number. Micronet does the rest and returns the cursor for the next item entry or payment.
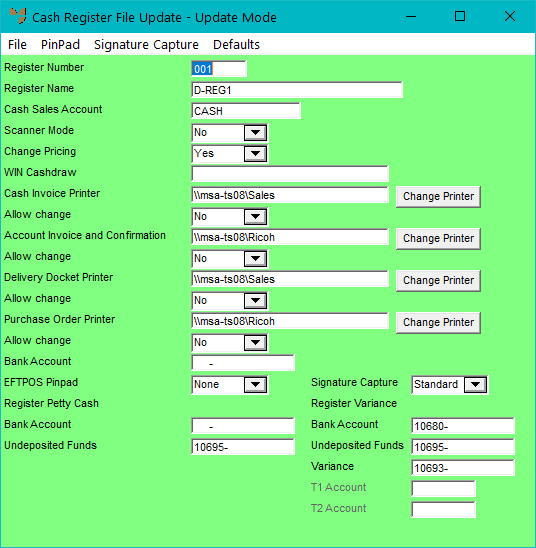
To add a cash register to the Cash Register master file:
Refer to "Accessing the Cash Register Master File".
Micronet displays the Cash Register File Update screen in Add Mode.
|
|
Field |
Value |
|---|---|---|
|
|
Register Number |
Enter a unique number for the new cash register. |
|
|
Register Name |
Enter a name to identify the register. |
|
|
Cash Sales Account |
Enter the default cash sales account for this register. You can have many cash sales accounts such as CASHSCHOOLS, CASHSCOUTS, or you could set one default cash account for each register as CASH001, CASH002, etc. |
|
|
Scanner Mode |
Select whether or not you are using a barcode device during sales processing. Options are:
|
|
|
Change Pricing |
Select whether pricing can be changed during sales processing. Options are:
|
|
|
|
Technical Tip If Scanner Mode and Change Pricing are both set to No, the user need only enter the part number. Micronet does the rest and returns the cursor for the next item entry or payment. |
|
|
WIN Cash Draw |
If you are using the Windows version of POS, enter the printer that has been configured for any special control characters set up for this specific cash drawer. |
|
|
Cash Invoice Printer |
Select the default cash invoice printer for this sales register. All cash invoices will be printed on this printer. |
|
|
Allow Change |
Select Yes if users can select alternative printers during the sales process, or No if you want only the selected printer to be used. |
|
|
Account Invoice and Confirmation |
Select the default account invoice and confirmation printer for this cash register. For POS sales transactions where items are not being picked up by customers, Micronet prints an order confirmation to this printer. |
|
|
Delivery Docket Printer |
Select the default delivery docket printer for this cash register. |
|
|
Purchase Order Printer |
Enter the default purchase order printer for this cash register. Micronet prints supplier purchase orders for all POS sales transactions to this printer. |
|
|
Bank Account |
Enter the bank account for this cash register. |
|
|
EFTPOS Pinpad |
If you have set up a PINpad for this cash register, select the PINpad. For more information, see "Cash Register File Update Screen - Menu Options". Select None in this field to turn off electronic payments in POS, e.g. when the Tyro EFTPOS Terminal is offline or not working. |
|
|
Signature Capture |
If you have set up a signature capture device for this cash register, select the device. For more information, see "Signature Capture". Select None in this field to turn off signature capture in POS, e.g. when the signature capture device is offline or not working. |
|
|
Register Petty Cash |
These fields allow cash to be used from the register takings and recorded. |
|
|
Bank Account |
Enter the account number of the Bank account set up in MGL where petty cash transactions will be applied. Payment types where the Bank Posting field is set to Automatic on the Enter Payment Types screen will integrate directly to this account. |
|
|
Undeposited Funds |
Enter the account number of the Undeposited Funds account set up in MGL where petty cash transactions will be applied. Payment types where the Bank Posting field is set to Manual on the Enter Payment Types screen will integrate directly to this account. |
|
|
Register Variance |
These fields allow variances identified during the cash register reconciliation End of Day process to be posted to General Ledger accounts. |
|
|
Bank Account |
Enter the account number of the Bank account set up in MGL where variances will be applied. Payment types where the Bank Posting field is set to Automatic on the Enter Payment Types screen will integrate directly to this account. |
|
|
Undeposited Funds |
Enter the account number of the Undeposited Funds account set up in MGL where variances will be applied. Payment types where the Bank Posting field is set to Manual on the Enter Payment Types screen will integrate directly to this account. |
|
|

|
Reference For more information about the Bank Posting field on the Enter Payment Types screen, refer to "Edit Company - Edit - Payment Types". |
|
|
Variance |
Enter the GL account where register variances are recorded. |
|
|
T1 Account |
|
|
|
T2 Account |
|